Testing the Bosch LSU 4.2 Broadband Oxygen Sensor
Broadband Oxygen Sensor (Lambda Sensor) Connection and testing.
Connecting any other equipment may result in damage to that equipment or to vehicle components.
Introduction
The Bosch part numbers covered in this technical note are:
- 0 258 007 200 (referred to as type 7200)
- 0 258 007 057 (referred to as type 7057)
This test evaluates the operation of the Bosch LSU 4.2 Oxygen Sensor (pre-catalyst) in relation to the air-fuel ratio using the Volt Drop method.
Note: The correct operation of the oxygen sensor depends on:
- the temperature of the sensing tip
- the mechanical condition of the engine
- fuel quality
- engine temperature
- the external environment of the sensor (contamination)
- the integrity of the engine management system
The following procedure assumes that the conditions mentioned above are all in order and the oxygen sensor is functioning correctly. Any failures identified with the operation of the oxygen sensor while conducting these tests does not necessarily indicate a fault with the oxygen sensor itself.
Often the oxygen sensor will display operational characteristics that are inconsistent due to fuelling or mechanical errors. The results obtained are therefore symptoms of underlying conditions and not the cause.
It is therefore essential to evaluate the engine mechanical condition and management system BEFORE condemning the oxygen sensor. All numerical readings quoted in this help topic are typical and not applicable to all engine types.
How to perform the test
- 1 x PICO-TA125 Test Lead
- 1 X PICO-TA126 Test Lead
- 1 X PICO-TA127 Test Lead
- 1 x PICO-TA018 Current Clamp
- 1 x 6-way Universal Breakout Lead Set (required size may vary)
- ChA : x1 Test lead ±1 V
- ChB : x1 Test lead ± 1 V
- ChC : x1 Test lead ±20 V
- ChD : 20/60 A current clamp ± 2 A
- Timebase: 1 s/div Sample count: 1 MS (min.)
Before taking any measurements taken with the PicoScope, we need to measure the resistance values of the calibration resistor circuit and the oxygen sensor heating element. Should either of these measurements differ from the specified value, please see the Troubleshooting section at the end of this technical note.
1. How to test the oxygen sensor heater element
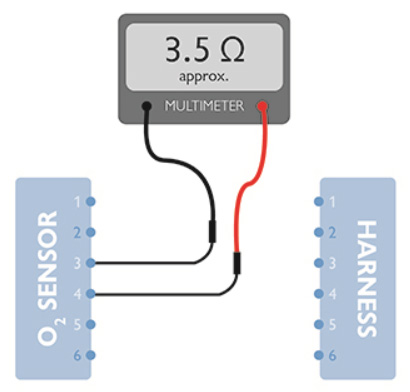
- Disconnect vehicle battery negative terminal.
- Disconnect oxygen sensor multiplug and locate terminals 3 and 4 of the oxygen sensor.
- Using a multimeter, measure and record the resistance value obtained between terminals 3 and 4 of the oxygen sensor (Figure 1). Value obtained: Approximately 3.5 Ω @ 20 °C.
- If the correct resistance value is obtained, move to 2.2 below.
- Should the resistance value obtained differ from the specified value, see the Troubleshooting section at the end of this Technical Note.
2. How to obtain the oxygen sensor calibration circuit resistance value
A calibration resistor is installed into the oxygen sensor connector at manufacture to ensure superior accuracy of the sensor across all air-fuel ratios. The resistor/connector is therefore specific to the sensor and cannot be replaced.
Note: Terminal numbers are stamped on the body of the oxygen sensor connector.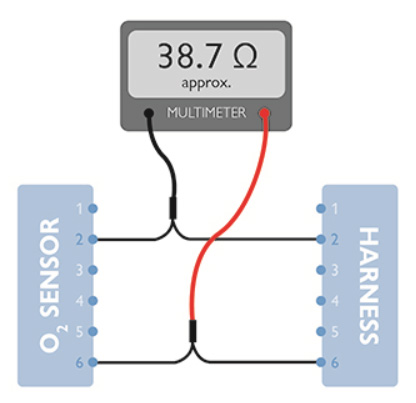
- Disconnect vehicle battery negative terminal.
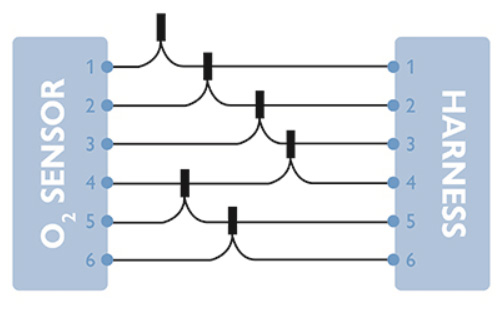
- Disconnect oxygen sensor multiplug and insert 6 x relevant breakout leads to complete reconnection of the oxygen sensor to the vehicle harness via the breakout leads (Fig 2).
- Using a multimeter, measure and record the resistance value obtained between terminals 6 and 2 of the oxygen sensor via the breakout leads (Fig 3). Value obtained: Approximately 38 Ω.
- If the correct resistance value is obtained, remove the multimeter and reconnect the vehicle battery
- Should the resistance value obtained differ from the specified value, see the Troubleshooting section at the end of this Technical Note.
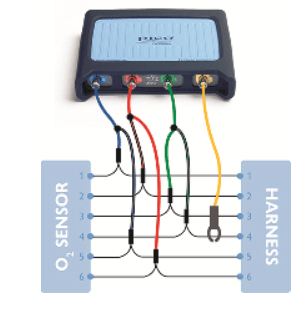
How to connect the PicoScope 4425
Once the resistance values have been confirmed the scope can now be connected to evaluate the oxygen sensor operation:
- Connect three test leads to Channels A, B and C of the scope.
- Connect Channel A blue test lead to the breakout lead connected to terminal 1 of the oxygen sensor, and the black ground lead to the breakout lead connected to terminal 5 of the oxygen sensor (here we acquire the Measurement cell voltage).
- Connect Channel B red test lead to the breakout lead connected to terminal 6 of the oxygen sensor and the black ground lead to the breakout lead connected to terminal 2 of the oxygen sensor (here we acquire the Pump cell voltage).
- Connect Channel C green test lead to the breakout lead connected to terminal 3 of the oxygen sensor and the black ground lead to the breakout lead connected to terminal 4 of the oxygen sensor (here we acquire the oxygen sensor heater control voltage).
- Connect the 20/60 amp current clamp to Channel D of the scope, Zero and link the clamp around the breakout lead connected to terminal 4 of the oxygen sensor (here we acquire the oxygen sensor heater current). Note: Check for correct orientation of the clamp to enable the scope to read a positive current value.
- Run your scope software by pressing either the spacebar on your keyboard or the Go (
 ) button in PicoScope.
 - Crank and start the engine, and allow idle speed to stabilise. Noise may be present on your waveform during the warm-up period of the oxygen sensor. This is an operation characteristic and not a fault.
- With the engine at the correct operating temperature carry out numerous momentary Wide Open Throttle (WOT) snap tests while monitoring the signal on Channel B (Pump cell voltage). Snap throttle tests will allow the air-fuel ratio to momentarily increase then decrease to reveal the switching function of the Pump cell.
- Press the Stop () button in PicoScope to halt the capture to enable waveform analysis.
 ) button in PicoScope.
 ) button in PicoScope to halt the capture to enable waveform analysis.
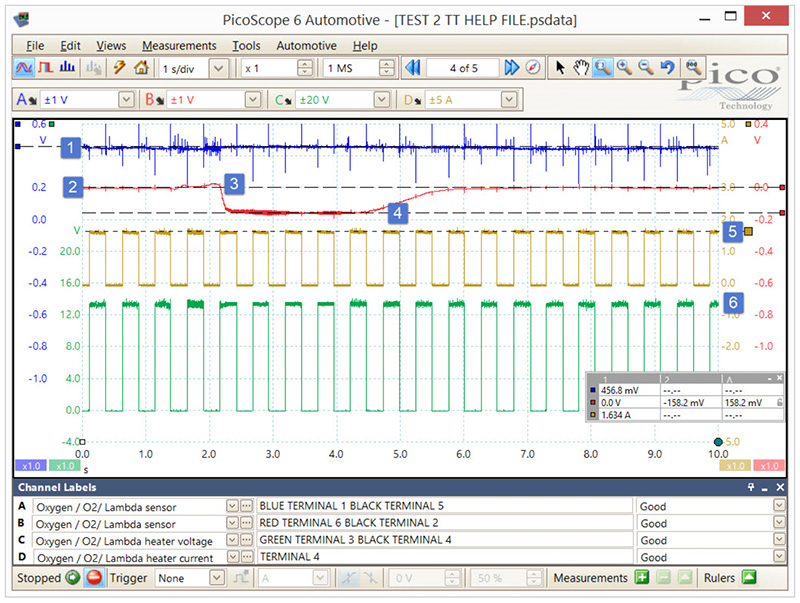
Example Waveform 1
Engine idling to WOT to idle
Example Waveform 2
Incorporating math channel
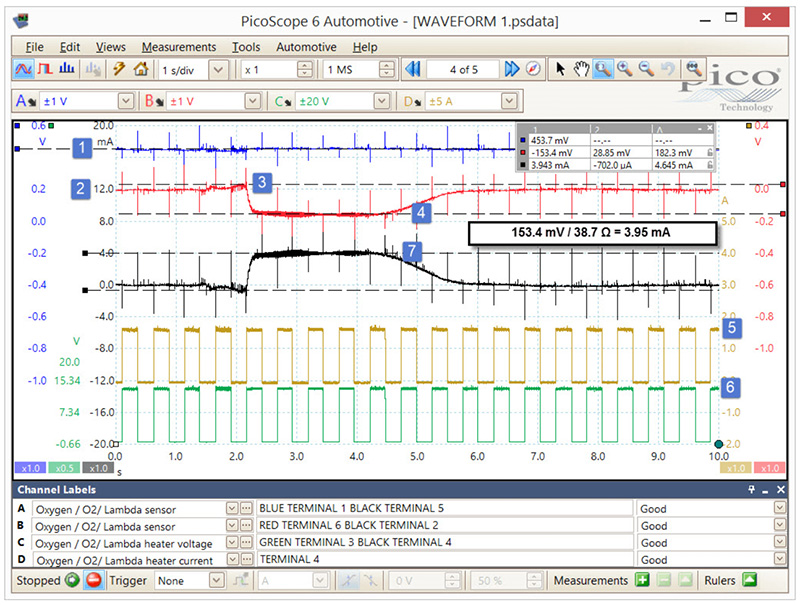
All values stated in the Example waveforms are typical, and not applicable to all engine styles.
Math Channel indicates the pump cell current derived from the formula Channel B / 38.7 Ω.
Waveform Diagnosis
Refer to vehicle technical data for specific test conditions and results
Typical values (engine at correct operating temperature):
 |
Engine idling: Oxygen sensor Measurement cell voltage should remain near stable at 450 mV regardless of engine fueling condition. |
|
 |
Engine idling: Oxygen sensor Pump cell voltage will rise and fall depending upon the level of oxygen content detected in the exhaust system. Under normal running conditions the voltage will remain fixed at 0 V indicating the correct stoichiometric air fuel ratio of 14.7:1 (lambda 1.0) The Pump cell voltage and current values have the following characteristics:
|
|
 |
WOT snap test: Indicates a small rise in Pump cell voltage at the point of WOT (+ 30 mV) as the oxygen content in the exhaust system falls due to acceleration enrichment (oxygen is pumped into the Measurement chamber). |
|
 |
Over-run fuel cut: Indicates a fall in Pump cell voltage (-158 mV) during the engine over-run fuel cut condition. The oxygen content in the exhaust system will therefore increase. (Oxygen is pumped out of the Measurement chamber.) The switching of the Pump cell voltage during WOT and over-run confirms the oxygen sensor to be performing correctly. The response to acceleration and deceleration of the engine should be near instant confirming the oxygen sensor response time to be efficient. The activity of the Pump cell is normally measured using a milliamp clamp rather than recording the voltage. Given the resistance value of the Pump cell circuit is known from the test carried out in Step 2 above, we can convert the recorded Pump cell voltage to a current value using Ohm's law (Current = Volts / Resistance) so removing the need for a milliamps clamp. See item 7 below and Example waveform 2 where a math channel is utilised to carry out this calculation and display the Pump cell current as an additional waveform.
|
|
 |
Engine running: Confirms the maximum heater circuit current (1.6 amps). The heater current waveform should mirror the PWM signal seen at point 6. |
|
 |
Engine running: Confirms good PWM control (>2 Hz) of the oxygen sensor heater element as the voltage is switched from 0 V to 13.5 V approx. The sensing element within the oxygen sensor requires a minimum operating temperature of 300 °C and will need to be controlled throughout the operation of the engine to ensure efficient functioning while maintaining reliability of the heater element. Note: There may be occasions where the PWM control of the oxygen sensor is halted by the PCM (during initial WOT). This is dependent on manufacturer and serves ultimately to improve fuel economy and emissions by reducing electrical load on the vehicle. The PCM may also vary the PWM control during the warm-up process to ensure the sufficient dispersion of water/ condensation under various environmental operating conditions.
|
|
 |
Waveform capture stopped: The example waveforms above do not directly measure the current flow through the Pump cell but do measure the voltage which will also change in proportion to current flow ( Given the resistance value of the Pump cell circuit was measured and confirmed as 38.7 Ω approx. we can incorporate this value into a 5th black Math channel to convert the Pump cell voltage measured using Current = Voltage / Resistance. I = V / R While the scope collects data from Channel B you will notice a 5th black maths channel will appear at the end of each screen capture. By stopping the capture (press the space bar or stop button) the math channel will appear on screen. Using the waveform buffer you can scroll through your captures and measure the Pump cell current from the maths channel which is directly proportional to the Pump cell voltage.
|
Measuring the activity of the broadband oxygen sensor using the volt drop method accompanied with Ohm's law removes the need for expensive milliamps clamp to measure tiny current values ranging from 0.5 mA to 3.5 mA.
More information
Bosch Lambda Sensor Universal (LSU) 4.2 wideband oxygen sensor
Modern emission regulations have forced tighter control of engine management systems throughout all engine speed and load ranges. The traditional oxygen sensor could accurately detect the stoichiometric air-fuel ratio at 14.7:1 (Lambda 1.0) with an output of approximately 450 mV. However, beyond the stoichiometric point, the traditional oxygen sensor would output either a rich signal (900 mV) or a lean signal (100 mV) with no indication of just how rich or how lean. The engine management would therefore compensate by adjusting the fuelling (closed loop control) back and forth (rich/lean) in an attempt to maintain the correct stoichiometric air fuel ratio. The traditional oxygen sensor could therefore only operate accurately in a very narrow range of air fuel ratios (14.7:1), hence the name Narrowband oxygen sensor.
The demand for increased accuracy, faster response times and reliability has seen the redevelopment of the narrowband oxygen sensor to the industry standard oxygen sensor utilised today across all manufacturers, the Wideband oxygen sensor.
The wideband oxygen sensor is often referred to as a broadband sensor or air-fuel ratio sensor (AFR sensor) and can be installed to both petrol / diesel engine vehicles.
The name wideband is derived from the sensor's ability to accurately detect the air fuel ratio across a wide spectrum from 10:1 to 20:1 (20:1 being ambient air) unlike the narrowband sensor's ability to detect only the stoichiometric ratio of 14.7:1.
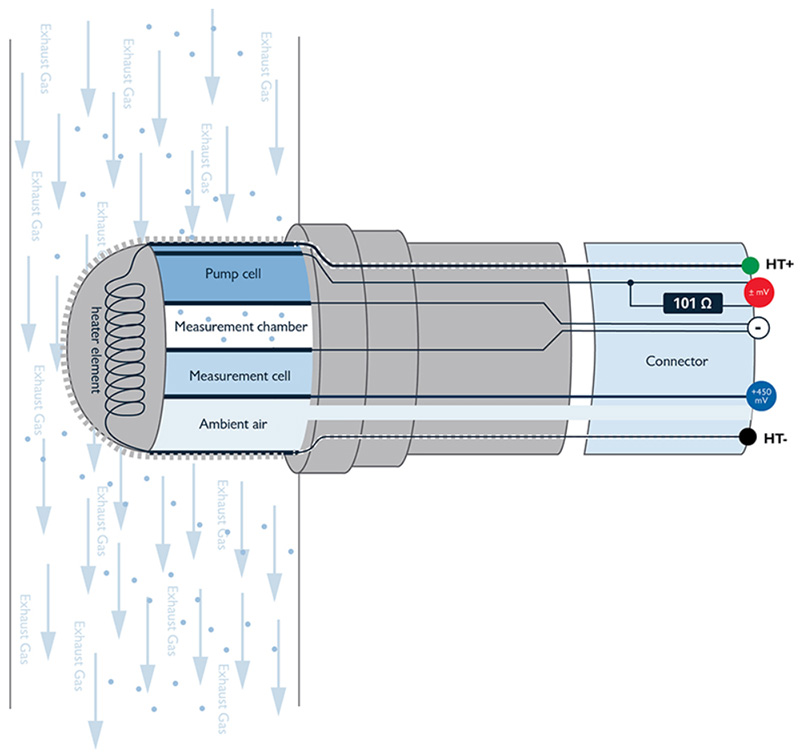
The wideband oxygen sensor does however incorporate a proportion of the operational characteristics of the narrowband sensor in the form of a Measurement cell. The measurement cell is exposed to atmospheric air on one side (reference air) and exhaust gas oxygen in the Measurement Chamber on the other. Assuming the oxygen content in the measurement chamber is maintained at a specified level, 450 mV is output from the wideband oxygen sensor measurement cell to the PCM (
Maintaining the correct oxygen level in the measurement chamber is paramount to ensure the voltage output from the measurement cell remains as close as possible to 450 mV throughout all fuelling conditions. This is achieved by the Pump cell.
The characteristics of the Pump cell are such that depending upon the amount and direction of current flow through the Pump cell (PCM controlled), oxygen can be pumped into or out of the Measurement chamber, so maintaining 450 mV output of the Measurement cell.
The current flow through the Pump cell is therefore used a direct and accurate indication of the air fuel ratio across a broad spectrum as a result of the oxygen content in the exhaust gas.
Control of the heater element of the broadband oxygen sensor is critical to the correct operation of the sensor. Oxygen sensors that remain unheated will eventually “clog” and require replacement, while electrochemical reactions inside the sensor that ensure the transportation of oxygen and the generation of voltages simply cannot take place if the oxygen sensor temperature is not maintained.
Troubleshooting
Oxygen sensor heater element
Should the oxygen sensor heater element resistance value obtained in Step 1 differ from the specified value (4.5 Ω approximately at 20 °C) replace the oxygen sensor.
- Check for short circuit between pins 3 and 4 and the remaining pins 1, 2, 5, and 6. >1 MΩ.
- Check for short circuit between pins 3 and 4 and the outer metal casing of the oxygen sensor (Chassis ground) > 1 MΩ. If a resistance value lower than 1 MΩ is obtained, replace the oxygen sensor.
Calibration resistor circuit
Should the calibration resistor value obtained in Step 2 differ from the specified value, remove the breakout leads (oxygen sensor and vehicle battery disconnected) and measure the resistance of the calibration resistor inside the oxygen sensor connector between terminals 6 and 2. It should be approximately 100 to 110 Ω (Fig 7). If the value obtained falls outside of the specified range, replace the oxygen sensor.
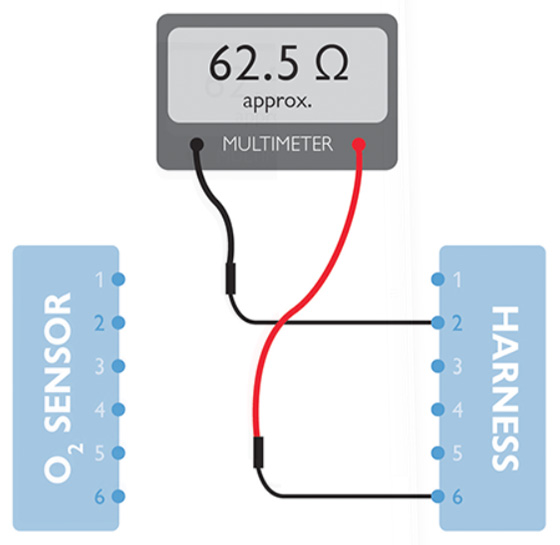
If the oxygen sensor calibration resistor value is found to be correct, measure the resistance value of the engine wiring harness (oxygen sensor and vehicle battery disconnected) between terminals 6 and 2. It should be approximately 62 Ω (Fig 8).
If the value obtained differs from the specified value, inspect and test the wiring harness between the oxygen sensor connector and the PCM for open or short circuits to chassis ground, for short circuits between terminals 6, 2 (battery disconnected) and for short circuits to battery positive (with battery reconnected and ignition off). If the results obtained confirm the engine harness to be serviceable then the PCM is suspect.